Lenovo THINKSERVER TS100 6434 Bedienungsanleitung Seite 35
- Seite / 110
- Inhaltsverzeichnis
- FEHLERBEHEBUNG
- LESEZEICHEN
- Installation Gui de 1
- Contents 5
- Safety vii 9
- Safety ix 11
- Safety xi 13
- CAUTION: 14
- Statement 15: 14
- Chapter 1. Introduction 15
- Chapter 1. Introduction 3 17
- Chapter 1. Introduction 5 19
- Installation guidelines 21
- Removing the side cover 24
- Installing a drive 31
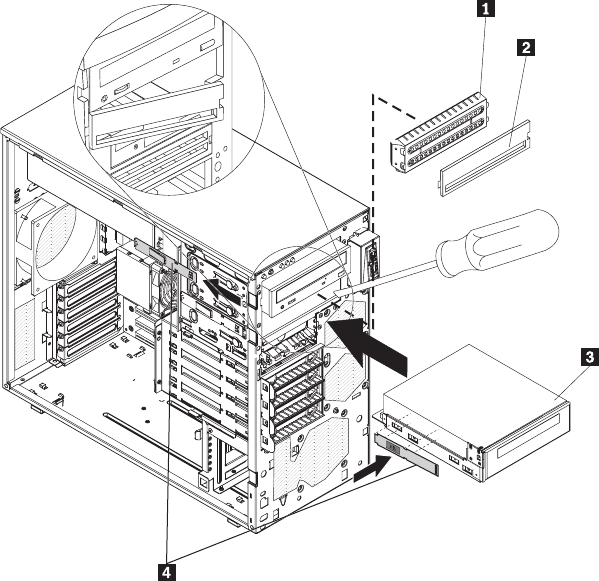
- Installing a tape drive 34
- Installing an adapter 40
- 3 Adapter 43
- Connecting the cables 47
- Front view 49
- Rear view 51
- Server power features 52
- Turning on the server 52
- Turning off the server 52
- Configuring RAID 56
- EasyStartup overview 57
- Installation requirements 59
- Installation order 59
- Diagnostic tools overview 65
- POST beep codes 65
- POST error codes 66
- Troubleshooting tables 76
- CD or DVD drive problems 77
- Diskette drive problems 78
- General problems 78
- Hard disk drive problems 78
- Intermittent problems 79
- Memory problems 81
- Microprocessor problems 82
- Monitor problems 82
- Optional-device problems 84
- Power problems 85
- Serial-device problems 86
- EasyStartup problems 86
- Software problems 87
- System-board LEDs 89
- Before you call 91
- Using the documentation 91
- Calling for service 92
- Using other services 93
- Appendix B. Notices 95
- Trademarks 96
- Important notes 96
- Appendix B. Notices 83 97
- Battery return program 99
- Appendix B. Notices 87 101
- Appendix B. Notices 89 103
- Part Number: 46U0852 110
- Printed in USA 110
- (1P) P/N: 46U0852 110
Verwandte Produkte und Handbücher für Computers Lenovo THINKSERVER TS100 6434
 (248 Seiten)
(188 Seiten)
(80 Seiten)
(130 Seiten)
(84 Seiten)
(96 Seiten)
(98 Seiten)
(154 Seiten)
(216 Seiten)
(248 Seiten)
(188 Seiten)
(80 Seiten)
(130 Seiten)
(84 Seiten)
(96 Seiten)
(98 Seiten)
(154 Seiten)
(216 Seiten)
 (74 Seiten)
 (126 Seiten)
(112 Seiten)
(88 Seiten)
(3 Seiten)
(126 Seiten)
(112 Seiten)
(88 Seiten)
(3 Seiten)
© 2020, manymanuals.de. Alle Rechte vorbehalten. | 5.503 s |
 Manymanuals.com
 Manymanuals.de
 Manymanuals.fr
 Manymanuals.it
 Manymanuals.pl
 Manymanuals.cz
 Manymanuals.es
 Manymanuals-pt.com
Kommentare zu diesen Handbüchern